

How to Make a Canva Print Ready File for a Banner: 7 Easy Steps

A Canva print ready file for one of our banners is a single-page PDF at the exact size you order. If the product has a template, use the exact template size instead. It is in CMYK color, flattened, with no crop marks and no bleed.
That last part is where most Canva guides lead you wrong. They tell you to tick “Crop marks and bleed”. For our large format products, you leave it off, because anything in the file gets printed [1].
Here are the 7 steps, in the order you do them.
Table of Contents
Why a standard Canva print ready file does not fit a banner
Bleed means extending your background a little beyond the finished size. The extra strip is cut away, which stops a thin white edge. Crop marks are small corner lines that tell the cutter where to slice. Some printers need bleed and crop marks, so always follow the specs of the printer receiving your file. Canva’s “Crop marks and bleed” download setting adds 1/8 inch (0.125 inch) of extra page on every side, plus the corner marks [3].
Our banners and signs work differently. On most of our large format products, your file should match the ordered size exactly and carry neither bleed nor crop marks [2]. The rule is spelled out plainly: “Remove all crop marks/bleed otherwise they will be printed” [1].
Business cards are the exception. Build those at 3.62 × 2.12 inches; the finished card is 3.5 × 2 inches [2].
Step 1: Start your Canva print ready file at the right size
Create a custom size in Canva and set the width and height in inches. A 3 × 6 foot banner is 36 × 72 inches.

Which size? Files should be “the same exact size as what is ordered” [1]. The exception is a product with a template, such as many fabric displays. Then your file must match the exact template size, which can differ from the graphic size [1]. Check the product page or ask us for the template before you start.
Check the size before you design, not after. Starting with a social media size and stretching it later softens every photo.
Big banners need one more check. If Canva will not let you enter your full size, contact us before you design. Do not shrink the file on your own. Our Help Center allows scaled files only over 200 inches [1], and we will tell you what works for your banner.
Step 2: Keep words and logos away from the edges
The safe area is the space inside the edges where your key words and logos belong [2]. Anything outside it can end up folded into a hem or cut off. A hem is the folded edge that holds a banner’s grommets, the metal rings you hang it by [2].
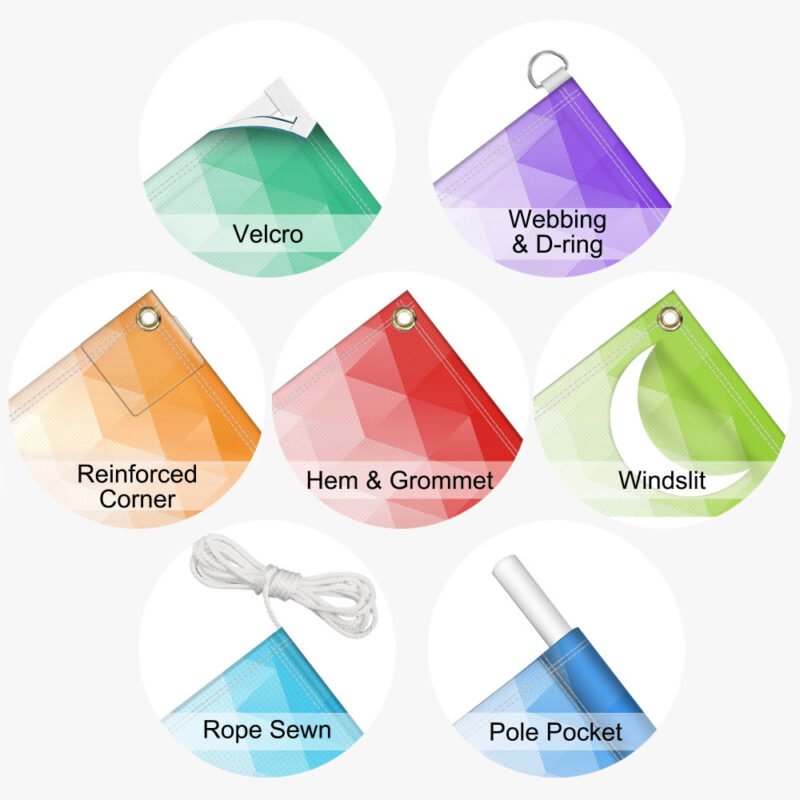
Our glossary gives these distances: at least 0.25 inch from the edge on rigid signs and at least 2 inches on flags [2]. On a banner, keep text and logos clear of the hems and grommet holes along each edge. If your product has a template, follow it for the placement of logos and graphics [1].
Step 3: Leave bleed out of the download
Canva has two bleed settings, and only one matters for your file. “Show print bleed” lets you see the bleed area while you design [3]. “Crop marks and bleed” in the download panel is what adds extra page and marks to the file [3].
For our banners, the key rule is simple: leave “Crop marks and bleed” off when you download [1]. Keep your background inside the page edge, and let it fill the whole page. A white gap at the edge will print as white, because we print on white material [1].
Step 4: Check the resolution at full size
Resolution means how much detail an image holds at its printed size. It is measured in dots or pixels per inch. Aim for 150 dpi or more, measured at the size the banner will print [2]. Blow a small web photo up to banner size and it prints fuzzy, with visible squares [2].
Here is what that means in pixels. A photo that fills a whole 36 × 72 inch banner at 150 per inch needs 5,400 × 10,800 pixels. Choosing PDF Print later cannot add detail that the photo never had.
Text you type in Canva and its simple shapes usually hold up well when enlarged. Placed photos and uploaded logos have pixel limits, and so do effects and anything that ends up as an image. Zoom in and check them at full size. If Canva warns you about image quality, fix that before you export.
Step 5: Download as PDF Print
Open Share, then Download, and set the file type to PDF Print [3]. That is the print-quality PDF option, and the one a Canva print ready file needs.
We accept a single-page PDF or a JPG [1]. A banner is one page, so download only the page you need.
Step 6: Untick crop marks, tick Flatten PDF
This step is where our file rules differ from most guides.
- Crop marks and bleed: off. We print anything in the file, crop marks included [1][2].
- Flatten PDF: on. We ask for a flattened PDF with nothing hidden in layers [1].
Other printers may ask for something different, so follow the specs of whoever prints your file. For ours, flatten it. Flattening can change how text is stored in the file, so check the export itself: zoom in and make sure text and photos still look sharp.
Step 7: Set the color profile to CMYK
Screens show color as RGB, mixing red, green and blue light. Printers use CMYK, the four inks cyan, magenta, yellow and black [2][3]. We print in CMYK only [1].
In the download panel, set Color profile to CMYK [3]. You need access to Canva’s CMYK export option. Vancouver Island University’s print shop says it is only available to paid Canva users [3], so see whether your plan includes it. We do not print RGB files [1].
No CMYK option? You have two choices. Use a Canva plan that includes it, or have our design team build the file.
The switch to CMYK typically shifts colors a little [3], so review the file and adjust anything that looks off. Your screen still only shows an approximation. A CMYK PDF does not promise an exact color match in print.
Check your Canva print ready file before you upload
Open the PDF on your computer and check these things:
- One page only [1].
- The page size matches your order, or the template size exactly [1].
- The color profile is CMYK [1].
- Photos have 150 dpi or more at full print size [2].
- No crop marks in the corners [1].
- No template artwork, guides or notes left in the file, since they would print [1].
- Nothing important sits outside the safe area or where the hems go [1][2].
- The file is under 100 MB [1].
Then add it to your order. Our Help Center has the full file rules, and our glossary explains any term you are not sure of.
Limits of Canva for print
A Canva print ready file still has limits. It will not give you an exact brand color match. We do not print Pantone or spot colors, which are special premixed inks [1], so for a strict brand color match, talk to a designer before you order.
Canva’s menus also change from time to time. If a setting name here does not match what you see, look for the same option under a new label.
How we can help
Rather not do the export yourself? Our design team builds print-ready files for banners, trade show graphics, flyers and business cards. You get a mockup to check and change before anything is final, and you keep the final and source files. When your Canva print ready file is ready, open your custom banner, click Start Quote, then Add to Cart & Upload to send it.
Frequently asked questions
Which Canva plan do I need for a Canva print ready file?
One that gives you the CMYK export option, because we print in CMYK only [1]. One university print shop says CMYK export is only available to paid Canva users [3]. If your plan does not have it, our design team can build the file for you.
Why does my banner look different from my screen?
Your screen makes color from light, and the press makes it from ink, so some colors shift [2][3]. Exporting in CMYK lets you see those changes before you order [3], but the screen is still only a guide.
Can I send a PNG from Canva?
No. We accept JPG or single-page PDF files only [1]. Use PDF Print with the CMYK profile for your Canva print ready file.
What if my design has several pages?
Each artwork is its own job. Create one job per artwork; you can add more jobs on the product page [1].
Sources
- Help Center: Artwork Files, Ordering & Shipping, 15X Prints: file types, exact size, no crop marks or bleed, CMYK only, 150 dpi, flatten, files over 200 inches, under 100 MB, one artwork per job
- Printing Terms Glossary, 15X Prints: bleed, crop marks, safe area, hem, grommets, DPI, CMYK, trim size, business card sizes
- Making Print Ready Designs in Canva, Vancouver Island University Print Services: PDF Print, crop marks and bleed checkbox, CMYK on paid plans
